Monday, October 3, 2011

Front Suspension pics

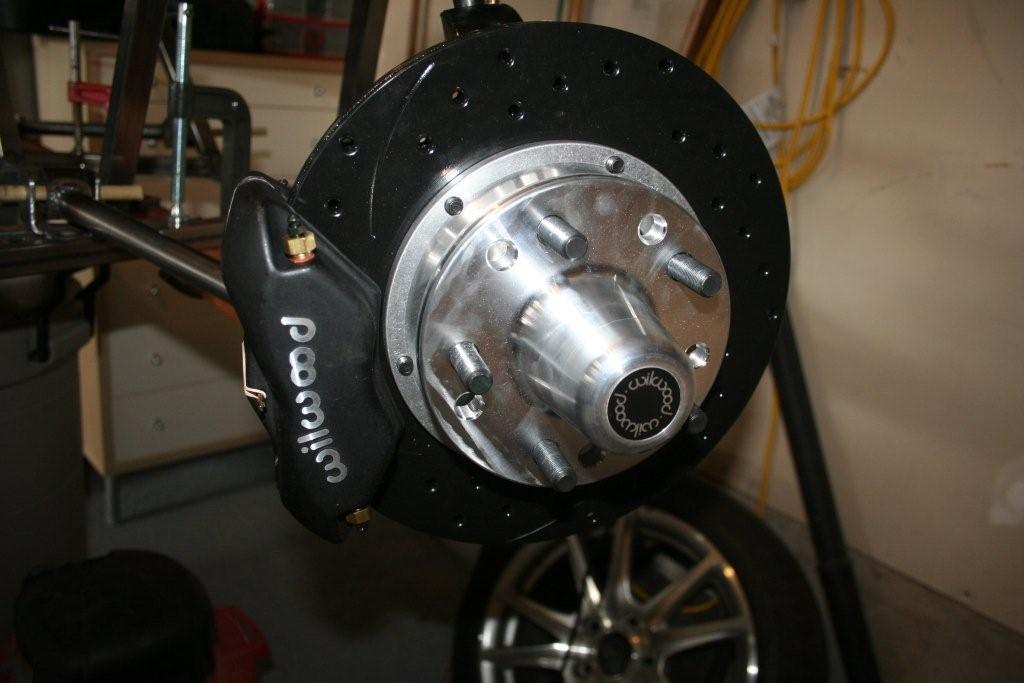
I realized I took some pics of the front suspension a while back but forgot to post. More work done since but this shows the a-arms and spindle / brakes.


Front a-arm mounts have been added since. I just put it there to look at it.


The fancy new Wilwood spindle / hub / brakes.


Monday, June 6, 2011

Shiney new parts

Again... not a lot of work has been done on the car in the last couple of months. Finding the time gets harder and harder. Hoping to take a week off soon while the kids are still in school and get a few solid days of work done.

I have managed to order some shiney new parts for the car. I bought a Wilwood Mustang II spindle and brake set. I built them up and have them ready for when I manufacture the front suspension. They look pretty slick and should have more than enough braking power for what will be a very light car. I've not been very good at taking photos of progress. I haven't taken any pictures for a while now. I need to get some pictures of the spindle / hub / brakes as they looking sexy.

I also bought a bunch of parts to make the front suspension. For the lower arms I got some screw in ball joint collars that I'll weld onto some steel arms. For the upper arms I bought a screw in ball joint collar but it also has a screw thread and clevis mount. This allows for adjustment of caster and camber after its put together with some fairly easy adjustments. At the chassis side I got some hiems that can mount onto some cross member mounts I bought. Problem is that the cross member doesn't really well so I might have to make my own mounts. Finally the tubes for the upper a-arms, I bought weld in threaded bungs. One side will be left handed thread and the other side right handed so I can simply twist to adjust and then hold in place with jam nuts. That's the theory anyway.

I also turned my attention to the engine again for a little bit. I finally got around to pulling the belt off and removing the airconditioning compressor which I won't be needing. I need to buy new shortened belt now the compressor is gone. I also pulled off the headers. I'm trying to get as much off the engine as I can so I can get some decently accurate measurements. I need to build the transmission tunnel and want as much foot room as I can. Its going to be critical to have just the right amount of clearance so I can get as much foot space as possible. Its going to be pretty tight for the pedals.

Now I've got the spindle made up and had a chance to measure the distance ball joint to ball joint I'm going to try to finalize the suspension design. Once done I'll order some steel tubing and the coil over shocks. I'd like to think that early summer I'll have the car able to sit on all 4 wheels. Doesn't sound like much but it would be nice to not need the construction table at the new house.

On the new house, we hope to be contacting contractors this week to find out the cost and timeline to do the work we want done. I'm also getting them to check the garage as there is some pretty major rot in sill plates. Its going to be a big job to repair. Depending on the cost I might just demolish the garage and build a new one. If we go for a new one I'll likely push the back of it out 10-15 feet which will make it a nice deep garage where I can have 2 cars side by side plus room for the workshop / project car at the back.

Off to design the front suspension!

Sunday, March 27, 2011

Diff mounts

There hasn't been a lot of work done of late. There's been quite a few things that have happened. I wanted to get in and re-paint the entrance, halls, stairs area in our house. I never did like the colour we painted originally and it was looking a little tired as it gets a lot of traffic. I wish we'd changed it years ago. It looks so much better. We also bought a new house which has meant we've been doing a few things here and there to get this place ready. The good news about the new house is that is has a double car garage so I'll have a lot more room to move. The new house needs a little bit of work so it will probably eat into the time I would have normally spent on the car. We are going to get contractors in to do some of the work but I'll likely want to do at least some of it myself. The basement is very dated with wood panelling. So what I have managed to do lately is get the diff mounted. I had to cut out the brace for the front diff mount to use the rear subframe. The rear mount I could re-use but I had to manufacture the front mounts. I used some plate steel and rectangular tube to make the mounts. I welded on some bolts to the mounts. Finally I put a new brace in to attach the mounts to. I haven't taken photos yet but will post them shortly. I've spent time trying to work out the front suspension. I've modelled what I plan to do in some software and I think it looks OK. Its tough to try to balance everything I read to come up with a good suspension design. I'm hoping that what I've got for now is OK. It would be hard to fix later but it CAN be fixed if it is really bad. I'm looking to use off the shelf parts for the upper a-arms. I need to pick the parts and make sure I can mount properly while leaving access for the coil overs. So that will hopefully be the next part tackled.

Sunday, January 16, 2011

Some back end decisions made

I'm behind on the blog... some of this was taken just after my last post and I'm just getting to it now. I also need to take some more pics. I've tacked in a few more tubes but I haven't taken any photos of it.


I bought the rear sub-frame home from the storage shed. I spun the frame around and put the entire rear subframe up on the table to see how it fits.


The back rail you can see on the left is the seat back of the car. The wheel is in its current position is about 200mm back from where the wheels would be if built by "the book". As you can see there is quite a bit of the sub-frame protruding into what should be the cabin. Main issue is the mount points at the bottom and the top cross member that the front diff mounts attach to.


Another picture of the top rail protruding in passed the seat back.


How the dif mounts at the front.


Another view of how the dif mounts


I removed the dif from the subframe so it was a little easier to move around (sub-frame with everything attached is heavy).


So I decided that I could cut off the front mounts and the top cross member. That way I could use the sub-frame and keep the rear wheels as far forward as possible. I was still a little worried that the wheels would be too far back and wouldn't look right. So I bought some cardboard and mocked up the outside shell of the car to get a feel for what it would look like.


After getting a feel for what the car would look like I thought pushing the rear wheels back would still look pretty good. So I decided to start major surgery on the sub-frame.


I took the sawzall to the to the top and cut it out. I took measurement before cutting it out so I can manfacture new front differential mounts.


Here's the subframe with the top tube cut out.


I marked up the cut of the front mounts and took the sawzall to it as well.


And after the sawzall has done its work.


And the other side.


Lining up the sub frame I tried to take as many measurement as I could so the sub-frame would be centred and square.


To get a good weld surface I cut a birds mouth in the tubes.


Another picture of the joint. I also welded a plate to the front but I didn't take a picture in detail of it.


At the top of the sub-frame I also cut a birds mouth to get a good weld area.


I took a wire brush to the area to clean off the black paint for welding.


Here it is with the the middle seat back tube mocked in place. The fit was pretty good. I also took all the subspension components off the sub-frame. After I was fine with the position of everything I took it all off. Made the job of measuring moving and cutting much easier when it is light enough to easily pick up.


A close up of the tube mocked in place.

So since these photos I've tacked it all in place. I've added a couple more brace tubes to the front of the frame, I added bracing in the seat back and I put a brace out to the sub-frame.

I put the differential back in so I could start the transmission tunnel. Got the first tubes in the seat back area tacked in place. I need to pull the engine out from under the construction table and start some detailed measurements for the transmission tunnel. I want to maximise the pedal box area as it will be pretty tight down there. The seating area is pretty narrow too. I was thinking about trying to sneek an inch or so extra room but I think I'll play it safe and go with the book dimension on it. A bit of movement in the differential on the rubber mounts without enough clearance wouldn't be good.

I put one side of the suspension back on and picked up the rear shocks from the storage shed. I'm still faced with 2 problems at the back.
1) I need to work out how to build the space frame for the back making sure I have clearance for the shocks which are mounted at the back of the subframe.
2) I was thinking of using the standard shocks for the back. But the weight of the car will be much less (so they may be too hard) and I have to work out mounting points. I was thinking I might try a push rod style suspension at the back. Put a pivot at the top of the subframe and mount the shock down to the rear cross-member of the sub-frame. I hadn't planned on doing push rod suspension but I might give it a go. I have to keep in mind I need room for a fuel tank somewhere at the back and it might be nice to at least have some storage space.

So I think the next little while will be me noodling on the rear suspension and measuring out the engine and transmission in detail for the transmission tunnel and engine mounts.

I still haven't done any more on the front suspension. I think I have picked what I want. I might try modeling my suspension in a software package that looked OK and not too expensive just to make sure its not terrible. I know I won't be able to manfacture it to the millimeter that I can model it to and that frames twists, tires deform etc.. I'm just looking to make sure that it is decent.

Monday, January 3, 2011

Frame continues

The build has been coming along quite nicely. A few things have happened lately.

I had an electrician come out just after Christmas and he put 3 new 20 amp circuits in the garage which has been great. I can have heat on, welder and run tools etc without worrying about whether I'm going to trip the breaker.

I also did a bit of a home insulation job on the garage door. So far it seems to be doing the job although we haven't had many cold days to try it out. I put the heat on to take the chill out of the air in the garage and it seems to stay reasonably comfortable. Hoping to continue to be able to work through the winter.

Now to the car. I've manage to get pretty much the full front of the frame tacked together. The only pieces I haven't tacked into place are the pieces around the transmission at the front. I need to get in and do some detailed measurements of the engine and transmission to get as much space for foot room as I can.


The frame tacked together from a couple of days ago. I've added side diagonal bracing since then.

At the back of the car I'm also up to the point where I need to decide what I'm going to do for the back-end. I've got 3 options that I'm considering.

1) Modify and weld in the S2000 rear subframe to the frame I've built to date. It is probably a heavy option but it should also save me a lot of time and its a proven rear end set-up. I've seen someone mid-build doing the same thing on another build site but I'm quickly catching up to where he is at and it isn't finished.

2) Create my own rear frame to accept the S2000 components. I'd replicate the geometry but using my own frame. Probably lighter but is likely a lot of work. Again... I've seen another mid-build doing this. It looks like a lot of work with notching bars etc.

3) Re-use the diff and uprights but but create my own a-arms.

I'm going to try to tackle the back of the car before moving onto the front suspension more than I already have. I'm pretty much decided on using Mustang II 2" drop spindles. I've done some drawing (cracked out my old drawing board... none of this CAD stuff) and done some calcs and it seems they should work nicely. The added bonus of using the Mustang II suspension is that replacement parts will be easy to source and it doesn't look like their popularity is going to subside. For the front upper a-arms I'm going to buy rather than build. I'll likely still build the lower a-arms. There is going to be some expense with buying new for all the front suspension. One of the reasons I'm going to tackle the rear first.


Parting shot is one I couldn't help doing. It seems everyone takes it "out for a drive" when the frame starts to look like at least a little like a car. Julie was a good sport and took the pics.

Sunday, December 19, 2010

Frame has started

I finally started on the frame yesterday and it was certainly exciting to get started. Getting everything ready has taken longer that I had anticipated.

Last weekend I made the stand part of the build table. I also managed to single handedly get the table top up onto the frame. Probably not the smartest thing to do by myself. The table top is very heavy and I ended up scraping knuckles getting it on. Once it was on I was happy and screwed it down to the frame. Last weekend was also a bit above freezing and I have some paint you can use in low temps, so I painted the table top as well so that I could mark out the frame.

So finally yesterday I got started. I layed out a centre line on the table and started marking out the bottom frame. I was happy to do the diagonal checks and everything looked square.


A view from what will be the back of the car with the frame marked out on the table.


A view from the front of the car marked out.


Another view from the front. The book was a constant reference laying out the frame.

After laying out the frame I went to the tube details in the back of the book and started cutting the tubes for the bottom rail. The chop saw worked well. I quickly used up over 25 feet of tubing cutting. I layed out the tubes on the board as I cut them.


The first few cut tubes layed out.


All the tubes for the bottom of the frame now cut and loosely in place.

Another view of all of the bottom of the frame layed out.
After the photos were taken I spent the time screwing wooden blocks along the edges of the frames. It helps hold all the tubes in place for a nice square bottom frame. I had to grind down a couple of tubes a little here and there to get a really nice tight fit. Overall I'm really happy with how its turned out.
I haven't had a chance to work on it today. I had the 3 kids most of the morning while Julie went out. I then got the 2 older kids to help me get the backyard skating rink ready while the youngest slept. I decided to try a plastic liner this year for the rink. Hopefully it gets nice and cold tonight so the water I filled up the liner with freezes.
If I get a chance this evening I might get out there and start tack welding the frame together. After tacking the frame I also need to build a jig for the very front of the frame. Once it is done the frame will start going 3 dimensional.
I've got the next 3 weeks off work (technically) although I already have a number of meetings I have to attend. I'm hoping to be able to get at least a bit of time each day to work on the car. The last week should be the most productive when the kids will be back at school.

Wednesday, December 1, 2010

Still not started the frame

So its December and I've still not started the frame. Its not what I'd hoped for. I was hoping to have at at least started to tack the frame together and there would be some progress.

What I have done of late is buy a lot of the steel. I bought what I think is all the square tubing I need and most of the steel plate. I'll still need some round tube but that will be a while off still.

I found a shop crane on sale. I'll need to put the engine in and out a number of times so rental would not work too well. I also got a self storage unit (I had to bring down the shed I built... don't ask) so I'll need to crane the engine and subframe into and out of the truck at home and the storage unit. I can justify just about anything.

I'm hoping to have a few weeks off over Christmas where I plan on getting some progress.

I finished another welding course last week which went well (not to brag but I got an A). I really enjoyed it. It was an arc welding course. I start a MIG course in January. The school also offers an advanced arc course and a TIG course. I might take those one day but the MIG should be enough for me to finish the car confidentally.

Thursday, October 21, 2010

Prep work

It's been a while since I created an entry. There's been no move on the construction of the car. I have my excuses!!! We were away for a couple of months back to Australia and Western Canada visiting family. And while there has been no move on the actual car there's been prep work going on.
- I did a big clean-out of the garage and put down an epoxy floor coating which is really nice.
- I've constructed a good workbench. And surrounded it with peg boards
- I've modified some shelving in the garage to be supported from the ceiling to remove a support that was in the way
- I build a small shed outside our house to get a few things out of the garage, however the shed is now "under review". One of my neighbours complained to the City. City now says I need a building permit. Not sure why as it is very small... but watch this space as I can see it becoming an on-going saga.
- I've bought the material for a construction table but yet to be put together... hopefully this weekend.

So once the construction table is done I'll likely order steel and get started. I've been doing another welding course at the local technical institute and its getting a lot better.

Hopefully early November I'll order steel and get the construction going. Looking forward to having some visible progress.

Sunday, July 4, 2010

Off to the scrap yard

So I pulled the seats out of the mini-van and loaded up the van with the cut up car. I tried to get the car all in with one load but it was a bit too big. I could probably have loaded it a little better to get it in one load but I wasn't too concerned. I got $37 for the scrap metal. $4 of that was for the Aluminium radiator. So not much for the metal but to be honest I thought I'd have to pay to get remove the frame when I first got the car so actually getting some money for it was better than expected. After getting the car out I got to give the garage a pretty good clean out.

I started cutting off a section of the front. There was a lot of steel to cut through and my sawzall is battery powered so took a while. I decided I needed to cut through less metal making subsequent cuts.


Half way through cutting off the front


Front clip outside


Another view of the front clip outside

Another view of the front clip. Look for the kid's razor scooter. I used it to help wheel it out. I just picked up the other side and wheeled it out of the garage


Julie was away for a week and I threatened to leave bits of car parts all over the front yard while she was away. I took this with the intention of emailing it to her. As it was I packed it all away after I cut it up as I wasn't all that keen to have it all laying around outside either.


The back end of the car in garage


Another view of the back half of the car in the garage.

Monday, June 21, 2010

RIP

So the S2000 really is no more. The final cuts to the body were completed over the last couple of weekends. Before being completely cut up, taken out of the car were the rear subframe, the last of the wiring harness, the gas tank and the rear bumper beam.

The body of the car has been slowly cut up into sections so that I can cart it away. I clipped the whole front of the car off and then cut it up into smaller pieces. Next came out the passenger and driver floors with rockers, the top of the transmission tunnel was cut off and I'll keep it for now in case I want to re-use as it has nice mounts for the hand brake and shifter. A little more trimming took out some of the metal behind the seats before the final blow as the back of the car was cut in half and fell off the jack stands. It was real milestone as I am now finished dis-assembly and can look forward to builing now. Next week when I'm off I'll pull out the seats of the mini-van and cart the cut up car to the scrap yard.

Before construction of the new car begins there will be some garage preparations to be done. On the list of things to do are:
1) Clean the floor and put down an epoxy paint. I wasn't able to do this before I got the car in because it couldn't be applied in winter.
2) Build myself a good work bench. This will require a bit of shelving modifications and tool organization.
3) Build a construction table. From looking on the internet people use steel studs with MDF for a rigid flat table to build the frame on
4) I'm considering getting a couple more outlets put into the garage. If I'm running a chop saw, welder, grinder and a heater (in winter) I'll be tripping the fuses all the time. This occurred occasionally last winter because of the heater.
5) Insulate the Garage - I don't have an insulated door and there are gaps etc. I'll be doing what I can to put in a bit of insulation so that the winter months aren't bitterly cold in there.

So the first big milestone of dis-assembly is complete. Time for the next chapter in the build. I plan on posting some more photos of the dis-assembly soon once I get them on my computer.

Monday, May 31, 2010

Release the beast

So the big news is that the engine is out. I finally managed to release the beast from the car over the weekend. I lowered the car down so the engine and trans sat on the dolly I'd made. I removed the trans support and front subframe, cut the front frame rail out and simply jacked the car up. The engine then easily rolled out.

Before I could remove the front subframe I had to remove the front suspension. This was relatively easy. I was amazed at the weight of the front uprights and brakes. Still trying to work out what to do with the front suspension. I like the idea of the single donor for most parts but still need to work out if I want to go with front upright from the S2000 or buy something different. If I buy something different it will likely cost me more money but may save weight and make the suspension design easier. Suspension design is something I need to spend more time reading up on. I've been reading bits and pieces on a forum about suspension design. I'm not sure if people just go way overboard with the designs and if it really makes that much of a difference.

I've managed to sell some more parts along the way as well. I'm well over the half way there to recovering my money on the original car. A lot of the big items are gone so I doubt I'll get all the money back. I do have a lot of parts to sell still so I might get close. We'll see. Its already a cheap engine and transmission for the engine I got. Add to this all the other parts I'll re-use like the wheels, differential, drive shafts etc and it was a good purchase.

Julie and the kids are heading away for a week so I'll have a full weekend (and maybe some evenings) to work on the car. I will probably cut the front end of the car off and cut it up to take to the scap metal yard. That will give me a lot more room in the garage to work. Once the front of the car is out I'll be able to drop the rear subframe out of the car. So more things to consider. I've seen people use the rear subframe of a miata for the back end of the car. I could do the same thing using the S2000 subframe. Weld in (or even bolt on) the rear subframe. It would likely save time and would make rear end suspension design easy. Again... something to think about.
After getting the engine out I was able to measure its dimensions. It is fairly compact but tall engine. I'll probably have to make the frame a little taller for the engine. Probably another 50 - 60mm taller.
So hopefully by the end of June I'll have the rear subframe out and the body will be all cut up and taken to the scrap yard. Before ordering the steel and welding up the frame I'll be doing a bit of work on the garage. I've got some paint for the floor to make the floors all nice to work on. I need to make a good work bench and generally get the garage ready for the build portion to start.


Suspension is out


Suspension out


Suspension out

Suspension out

The engine is out. Exciting moment!

Engine out


Front end with subframe removed and front rail of the frame cut out


Engine out and rail cut out. See all the way to the diff!!